

Cutting curly hair takes more than just a sharp pair of scissors and good intentions. Did you know that curly hair can shrink by nearly 30 percent after it dries? Most people are shocked when they see just how much curl patterns can change from wet to dry. That is why the smartest stylists swear by step-by-step planning and curl-specific tools before making the first cut.
Table of Contents
- Step 1: Gather The Right Tools For Curly Hair Cutting
- Step 2: Prepare Your Curly Hair For Cutting
- Step 3: Assess Curl Patterns And Plan Your Cut
- Step 4: Execute The Curly Hair Cutting Technique
- Step 5: Check For Evenness And Define The Style
- Step 6: Maintain The Fresh Cut With Aftercare Tips
Quick Summary
| Key Point | Explanation |
|---|---|
| 1. Use specialized curly hair tools | Gather professional cutting scissors, wide-tooth combs, and specific styling products designed for curly hair to ensure optimal results. |
| 2. Prepare hair with moisture and detangling | Wash and condition curly hair thoroughly, using a wide-tooth comb to detangle and preserve the natural curl pattern before cutting. |
| 3. Assess curl patterns before cutting | Identify different curl types and their unique characteristics to tailor your cutting technique for the best result. |
| 4. Cut hair dry and curl by curl | Always cut curly hair when dry and work on small sections to maintain the integrity of the curl shape and prevent harsh lines. |
| 5. Implement an effective aftercare routine | Maintain curls by using moisture-rich products and protective methods to keep your haircut looking stunning and healthy. |
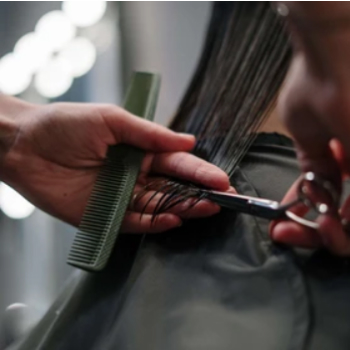
Step 1: Gather the Right Tools for Curly Hair Cutting
Preparing for a precision curly hair cut begins with assembling the perfect toolkit. Professional hairstylists understand that specialized tools make a significant difference when working with unique curl patterns. Your cutting success depends on selecting instruments designed specifically for curly hair textures.
Start by gathering essential professional cutting tools that will help you manage and style curly hair with expertise. Professional hair cutting scissors are your primary instrument. Unlike standard scissors, professional shears have sharp, precise blades engineered to cut hair cleanly without causing unnecessary damage or creating harsh lines. Look for scissors with ergonomic designs that reduce hand fatigue during detailed cutting work.
Next, collect supporting tools that will help you manage curl complexity. A wide-tooth comb becomes critical for detangling without disrupting natural curl patterns. According to the American Academy of Dermatology, working with wet, conditioned hair using a wide-tooth comb helps prevent breakage and maintains curl integrity. Complementing the comb, secure sectioning clips to partition hair systematically, ensuring even cutting and maintaining control throughout the styling process.
Additional must-have items include a reliable spray bottle for maintaining hair moisture, hair clips for precise sectioning, and high-quality styling products compatible with curly hair textures. Professional stylists also prioritize sanitation supplies like EPA-registered disinfectant and clean towels to maintain a hygienic workspace.
Pro tip: Invest in tools specifically designed for curly hair. Cheaper alternatives might save money initially but can compromise cutting precision and hair health. Quality tools represent a professional investment in delivering exceptional styling results.
By carefully selecting and preparing your tools, you set the foundation for a successful curly hair cutting experience. Each instrument plays a crucial role in transforming unruly curls into beautifully structured, personalized hairstyles.
Below is a summary table of the essential tools for cutting curly hair, including their specific purposes. This helps ensure you have the right items for a successful, professional cut.
| Tool | Purpose |
|---|---|
| Professional hair cutting scissors | Clean, precise cuts without damaging curls |
| Wide-tooth comb | Gentle detangling that preserves curl pattern |
| Sectioning clips | Dividing hair into manageable sections |
| Spray bottle | Maintaining hair moisture during the process |
| Hair clips | Further securing and organizing hair sections |
| High-quality styling products | Supporting curl health and style during and after cut |
| Sanitation supplies | Ensuring a hygienic and safe cutting environment |
Step 2: Prepare Your Curly Hair for Cutting
Curly hair preparation requires strategic moisture management and thoughtful detangling techniques that preserve your natural curl pattern. Understanding how to approach this critical stage transforms an ordinary haircut into a precision styling experience.
Begin by thoroughly washing your hair using a sulfate‑free, moisture‑rich shampoo designed specifically for curly textures. Hydration is paramount when preparing curly hair for cutting. After shampooing, apply a generous amount of conditioner, focusing on saturating each strand from root to tip. According to the American Academy of Dermatology, conditioning helps detangle and protect delicate curl structures during the cutting process.
While your hair is still wet, use your fingers or a wide‑tooth comb to gently separate and detangle sections. Work methodically, starting at the ends and gradually moving toward the roots. This approach minimizes breakage and helps you understand your hair’s natural fall and curl pattern. Pro tip: Avoid brushing dry curly hair, as this can cause frizz and disrupt the curl formation you want to preserve during cutting.
Create a clean, organized workspace with good lighting and a large mirror. Section your hair into manageable quadrants using hair clips, ensuring each section is detangled and smoothed before cutting. Pay close attention to areas with different curl densities or patterns, as these will require individualized cutting techniques.
Before picking up your scissors, assess your hair’s current length, shape, and any existing damage. Identify split ends, uneven growth, or areas needing particular attention. By taking time to understand your hair’s unique characteristics, you set the stage for a more precise and personalized cutting experience.
The checklist below summarizes the key preparation steps to verify before you begin cutting curly hair. Use this as a reference to make sure your hair is ready for optimal results.
| Preparation Task | What to Check For |
|---|---|
| Hair is thoroughly moisturized | Even hydration throughout all sections |
| Hair is completely detangled | No knots; curls separated with wide-tooth comb |
| Hair is systematically sectioned | Organized quadrants or parts secured with clips |
| Work area is ready | Clean, bright space; large mirror in position |
| Problem areas assessed | Identified split ends and regions needing attention |
Verify your preparation by checking that your hair is evenly moisturized, completely detangled, and sectioned systematically. Your curls should look defined, smooth, and ready for expert shaping. This meticulous groundwork ensures your cutting technique will enhance your hair’s natural beauty and movement.
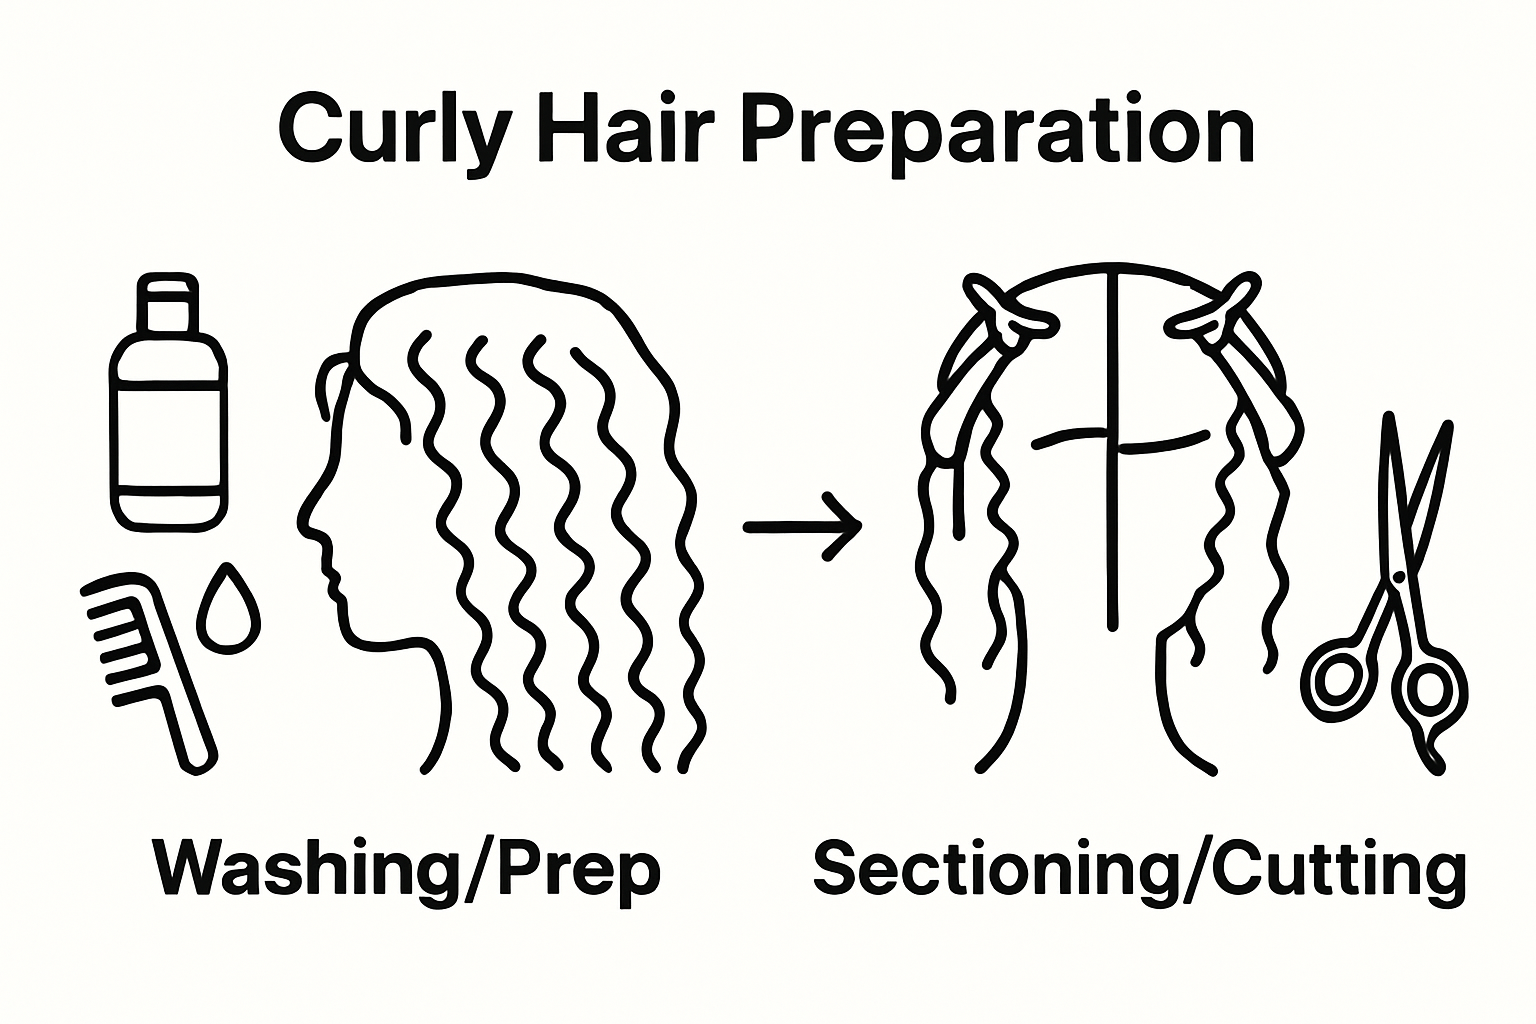
Step 3: Assess Curl Patterns and Plan Your Cut
Successful curly hair cutting requires a nuanced understanding of your unique curl landscape. Each head of curly hair presents a complex topology of wave patterns, textures, and individual strand behaviors that demand careful, personalized assessment before the first scissor snip.
Curl pattern identification becomes your critical first task. Professional stylists recognize that curly hair is rarely uniform, with different sections potentially showcasing multiple curl types ranging from loose waves to tight coils. Start by examining your hair in its natural, unmanipulated state. Observe how curls form, their tightness, and how they fall when dry. Look closely at the crown, sides, and back of your head to map out distinct curl variations.
According to scientific research, curl patterns are incredibly complex. Individual hair strands can vary significantly even within the same head, with microscopic differences in curvature and cross‑sectional shape. This complexity means your cutting strategy must be dynamic and adaptive.
Consider your hair’s unique characteristics beyond just curl type. Texture density, strand thickness, and natural hair behavior all influence how your cut will ultimately look and behave. Thicker, denser curls might require more strategic layering to prevent unwanted volume, while finer curl patterns might need different length considerations to maintain shape and movement.
Take time to examine potential problem areas. Look for sections with more damage, uneven growth, or persistent styling challenges. These regions will require specialized attention during your cutting process. Pay special attention to how your curls naturally fall and where they tend to create bulk or appear flat.
As you complete your assessment, visualize the final desired shape. Your cutting plan should work with your hair’s natural tendencies, not against them. Sketch a mental blueprint that considers how each section will contribute to the overall style, ensuring a harmonious, well‑structured result that celebrates your hair’s inherent character.
Verify your assessment by confirming you understand your hair’s unique curl map, have identified potential cutting challenges, and have a clear vision of the desired outcome. This preparatory step transforms cutting from a random act into a precise, intentional art form.
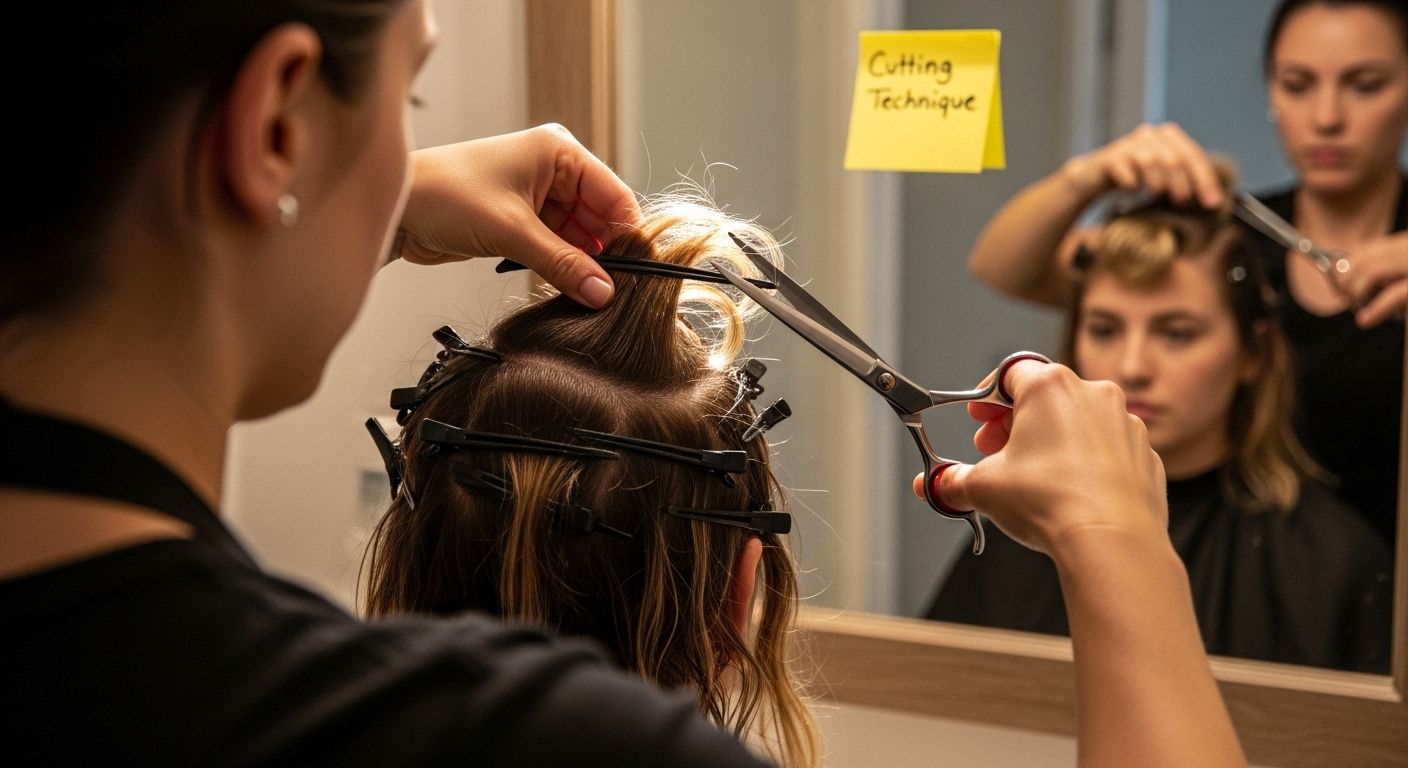
Step 4: Execute the Curly Hair Cutting Technique
Precision cutting for curly hair demands a methodical approach that respects each curl’s unique geometry and natural movement. The execution phase transforms your careful preparation into a transformative styling experience that celebrates your hair’s inherent character.
Begin with dry hair positioned in its natural state. According to biomechanical research, curly hair’s complex structure means minimal tension is crucial during cutting. Work with small, manageable sections, using your fingers or a wide‑tooth comb to define individual curl groups. This technique allows you to see exactly how each curl falls and how much length needs to be removed.
Employ the point cutting technique, which involves cutting into the hair at an angle rather than straight across. Hold your scissors vertically and make gentle, soft cuts that create a more natural, textured finish. This method prevents harsh lines and allows curls to maintain their organic shape. Carefully snip the ends, removing only the minimum necessary length to achieve your desired style.
Cutting curl by curl provides the most precise approach. Isolate individual curl clusters, examining how they naturally form and fall. Make strategic cuts that work with your hair’s inherent pattern, removing damaged ends while preserving the curl’s natural bounce and movement. Pay special attention to areas with different curl densities, adjusting your technique to maintain a balanced, harmonious look.
Be mindful of curl shrinkage. Curly hair can appear significantly shorter when dry, so always err on the side of caution and cut less than you think you need. It’s easier to remove additional length later than to correct an overly aggressive cut. Periodically step back and assess your progress, ensuring symmetry and maintaining the overall shape you envisioned during your initial assessment.
As you near completion, cross‑check your work. Examine the cut from multiple angles, ensuring even length and balanced curl formation. Gently shake out your hair to see how curls naturally fall and make any final, subtle adjustments. The goal is a cut that looks effortless and natural, highlighting your hair’s unique texture and personality.
Verify success by confirming that your cut enhances your natural curl pattern, removes damaged ends, and creates a shape that moves and falls beautifully. Each curl should look intentional, healthy, and full of life.
Below is a table summarizing the main steps in the curly hair cutting process, along with the primary objective or outcome for each stage. This overview helps guide you through the full routine.
| Step | Main Objective |
|---|---|
| Gather the right tools | Have all necessary, professional-grade equipment |
| Prepare curly hair for cutting | Clean, detangle, section, and assess hair health |
| Assess curl patterns and plan your cut | Understand unique curl types and design a strategy |
| Execute the cutting technique | Cut curl by curl for precision and natural results |
| Check for evenness and define the style | Ensure balance, shape, and refine the final look |
| Maintain the fresh cut with aftercare tips | Protect curls, retain shape, and boost hair health |
Step 5: Check for Evenness and Define the Style
The final stage of curly hair cutting transforms technical precision into artistic expression. Defining your style requires a meticulous approach that celebrates your hair’s unique texture while ensuring a balanced, harmonious result.
Begin by letting your curls settle into their natural configuration. According to professional haircutting standards, systematic checking is crucial for achieving a refined look. Use multiple mirrors to examine your cut from different angles, rotating your head slowly to assess symmetry and overall shape. Vertical and horizontal balance becomes your primary focus, ensuring each curl section complements the others.
Curl-by-curl refinement distinguishes exceptional cuts from ordinary trims. Carefully examine each curl cluster, looking for any inconsistencies in length or shape. Use your fingers to gently separate and assess individual curl groups, making subtle adjustments with your professional shears. The goal is to create a cut that looks intentional yet effortless, with each curl falling precisely where it should.
Pay special attention to potentially problematic areas like the crown, sides, and neckline. These regions often require additional precision to maintain the overall style’s integrity. Gently manipulate your curls, checking how they fall when you move your head. Look for any areas that appear longer or shorter than the intended design, making minimal corrections to achieve visual harmony.
Moisture plays a critical role in final style definition. Apply a small amount of curl‑enhancing product, working it through your hair with your fingers. This step helps reveal the true fall of your curls and allows you to make any final, minor adjustments. Watch how the curls form and settle, using this natural movement as a guide for any last‑minute refinements.
Step back and view your cut holistically. Professional stylists know that the perfect curly haircut should look effortless from every angle. Shake out your hair, let it fall naturally, and assess its movement and shape. The ultimate test is how the style looks when you’re moving, not just standing still in front of a mirror.
Verify success by confirming these key criteria:- Symmetrical shape from all angles- Consistent curl pattern and length- Natural‑looking movement and bounce- No harsh lines or uneven sections
A truly exceptional curly hair cut celebrates your unique texture while providing a polished, intentional appearance that looks completely natural.
Step 6: Maintain the Fresh Cut with Aftercare Tips
Preserving the beauty of your freshly cut curly hair requires a strategic approach that protects your style and maintains your hair’s natural health and vibrancy. Aftercare is not optional it’s essential for keeping your curls looking stunning long after leaving the styling chair.
Establish a moisture‑focused washing routine that respects your curl’s delicate structure. According to dermatology experts, curly hair thrives with minimal washing—aim for every 2‑3 weeks using sulfate‑free, curl‑specific shampoos. When you do wash, focus on gentle cleansing that preserves natural oils. Use lukewarm water and focus shampoo on your scalp, allowing the suds to naturally cleanse the length of your hair without excessive rubbing.
Protect your curls during sleep by investing in silk or satin pillowcases and nighttime styling techniques. The “pineapple” method—gathering your hair loosely at the top of your head—prevents crushing your curl pattern and reduces friction. Alternatively, use a loose, protective braid that maintains your cut’s shape while you rest. These techniques minimize breakage and help your style remain fresh between washing.
Hydration is your curl’s best friend. Incorporate leave‑in conditioners and curl‑specific moisturizing products that enhance your hair’s natural texture. Apply products to damp hair, using the scrunching technique to encourage curl definition. Pay special attention to the ends, which are most prone to dryness and damage. Consider weekly deep conditioning treatments that restore moisture and protect your newly cut style.
Be mindful of environmental challenges that can compromise your curl health. Protect your hair from sun and heat damage by using products with UV protection and limiting direct exposure during peak hours. When swimming, apply a protective oil or leave‑in conditioner before entering chlorinated or saltwater, and rinse thoroughly afterward to prevent mineral buildup.
Schedule regular maintenance trims every 8‑12 weeks to prevent split ends and maintain your cut’s original shape. Between professional cuts, use sharp, professional‑grade scissors for any necessary touch‑ups, working carefully to preserve your style’s integrity.
Verify your aftercare success by checking these key indicators:- Curls remain defined and bouncy- No excessive frizz or dryness- Minimal breakage- Maintained cut shape and length
Use this aftercare checklist to help maintain your curly haircut, ensuring your style remains vibrant and healthy. Reference these criteria regularly for ongoing hair health.
| Aftercare Task | How to Check Success |
|---|---|
| Moisture-focused washing routine | Curls stay defined and bouncy |
| Nighttime protection (silk/satin) | Minimal frizz, curl pattern preserved overnight |
| Product use (leave-in, deep condition) | No excessive dryness, ends feel hydrated |
| Avoid environmental damage | No visible sun, chlorine, or heat-related issues |
| Regular trims/touch-ups | Maintained shape, minimal split ends or breakage |
Experience Expert Curly Hair Transformations at Joel C Ma Hair Studio
Are you tired of struggling with uneven lengths, frizz, and unpredictable results every time you cut your curls at home? The article “Master Cutting Curly Hair Techniques for Stunning Styles” highlights the challenges of working with unique curl patterns, moisture management, and achieving balanced, healthy shapes. You deserve results that enhance your natural texture instead of causing frustration. At Joel C Ma Hair Studio, our award-winning salon specializes in personalized curly hair solutions, using advanced techniques that honor your individual curl type and bring out the best in your hair.
Stop worrying about split ends, breakage, or disappointing DIY cuts. Our expert stylists provide precise consultations and artistry backed by over 25 years of experience. Discover the difference of a tailored approach that puts your needs first. Ready for a transformation that makes you love your curls every day? Book your appointment now at Joel C Ma Hair Studio in La Jolla and see real client results on our social channels. Take the first step toward the stunning, manageable style you have always wanted.
Frequently Asked Questions
What tools do I need to cut curly hair?
You will need professional hair cutting scissors, a wide-tooth comb for detangling, sectioning clips, a spray bottle for moisture, and styling products suitable for curly hair. Quality tools designed for curly textures are crucial for achieving the best results.
How do I prepare curly hair for cutting?
Prepare curly hair by washing it with a sulfate-free shampoo followed by a moisture-rich conditioner. Detangle with a wide-tooth comb while the hair is wet, and section it into manageable parts for a precise cut during styling.
What cutting techniques work best for curly hair?
Point cutting is an effective technique for curly hair as it involves cutting at an angle to prevent harsh lines and maintain the natural shape of the curls. It’s important to cut curl by curl and be mindful of curl shrinkage, cutting less than you think you need to avoid an overly short cut.
How can I maintain my curly haircut after cutting?
To maintain your curly haircut, establish a moisture-focused washing routine, use silk or satin pillowcases to protect your curls at night, incorporate leave-in conditioners, and schedule regular maintenance trims every 8-12 weeks to keep your style fresh and healthy.


