
Wedding Hair at Home for Brides and Guests: 450°F Prep, Veil Rules

The most dependable at-home wedding hairstyles are the low bun, the half-up half-down, loose waves, a textured ponytail, and the bubble braid, because each one tolerates a steady hand and a little imperfection. Low buns and half-up styles suit brides with a veil; loose waves and bubble braids work well for guests with short to long hair. A hair trial and heat protection up to 450°F can help a style last through dinner.
TL;DR:
- Wash the evening before, style on second day hair for added grip, and apply heat protectant before hot tools rated up to 450°F.
- For a low bun, place the veil comb one to two inches above the style and secure it with two or three crossed pins.
- In heat or humidity, choose a low bun or slicked back style over loose waves, and finish with anti frizz serum and flexible hold hairspray.
- Hire a stylist for complex veils, extensions, tight schedules, or high humidity; special occasion updos at Joel C Ma Hair Studio start at $100.
Table of Contents
- Easy DIY Wedding Hairstyles You Can Create at Home
- Prep Routine and Tools That Make DIY Styles Hold
- Where to Place Your Veil With Each Hairstyle
- Running a Hair Trial and Timing Wedding-Morning Styling
- Keeping DIY Wedding Hair Intact Through Heat and Humidity
- Building a Hair Care Routine Before the Wedding
- Photographing Your At-Home Wedding Hairstyle
- Common Mistakes to Avoid When Styling Wedding Hair at Home
- What a Stylist Wants Brides to Know About DIY Hair
- When to Bring in Joel C Ma Hair Studio Instead
- FAQ
- Sources
Easy DIY Wedding Hairstyles You Can Create at Home
A handful of styles cover almost every length, texture, and dress code. Pick one that matches your hair’s natural behavior rather than fighting it for an extended styling session.
- Low bun: Smooth hair into a low ponytail, twist into a knot, and pin around the base; works on fine to thick hair and pairs well with a low veil placement.
- Half-up half-down: Section the crown, backcomb slightly for volume, secure with a small elastic, and pin flat; suits brides who want hair out of their face without a full updo.
- Loose waves: Use a curling wand on dry hair in small sections, alternate curl direction, then brush out gently for a soft finish; our beach waves guide walks through the technique step by step.
- Textured ponytail: Apply texturizing spray to dry roots, gather hair high or low, wrap a strand around the elastic to hide it, and pin.
- Bubble braid: Section a ponytail into even parts, add small elastics at regular intervals, then gently pull each section outward to create the bubble effect, a technique that works on many textures and can be heatless, as Brides explains.
- Classic chignon: Twist a low ponytail into a tight coil and pin flat against the head for a polished, minimal-fuss look.
- Fishtail braid: Divide hair into two sections and cross small pieces from the outside of each into the opposite section, a heatless option for long hair.
- Slicked-back bun: Use gel or a smoothing cream to flatten flyaways before pulling hair into a tight low bun, a formal option that holds up across hair lengths and textures, according to The Knot.
- Face-framing curls with a clip: Curl the front pieces only, pin the crown back with a decorative clip, and leave the rest down.
- Twisted half-up: Twist two small sections from each side of the head toward the back and pin together instead of using a backcomb step.
- Braided crown: Create two loose braids from each side and cross them over the top of the head, pinning as you go.
- Low side-swept waves: Curl hair, then sweep it over one shoulder and pin loosely behind the opposite ear.
- High bun: Gather hair high on the crown, twist, and pin for a style that keeps hair fully off the neck in warm weather.
- Simple tucked ponytail: Smooth hair into a sleek ponytail and tuck the end under itself, securing with a bobby pin for a no-heat finish.
Short hair takes well to the textured ponytail, slicked-back bun, or face-framing curls, while long hair handles braided crowns and fishtail braids with more visual impact. Medium-length hair has the widest range, including low buns and twisted half-up looks, a flexibility The Knot also notes for this length category.
Prep Routine and Tools That Make DIY Styles Hold
Second-day hair often holds a style better than freshly washed hair because natural oils give strands more grip, which is why stylists frequently recommend skipping a wash the morning of a wedding. Plan your last full wash for the evening before instead.
Heat protection matters just as much as timing. Apply a heat-protectant spray to damp or dry hair before any hot tool, since quality protectant products shield hair up to 450°F, and our own heat protection guide covers application in more depth. A finishing hairspray after styling locks curls or smooth sections in place, a step professional styling routines consistently build in.
Keep this kit nearby: a 1-inch curling wand, a boar-bristle brush, snag-free elastics, bobby pins in two shades, a texturizing spray, and a flexible-hold hairspray.
- Wash and deep-condition before the wedding day, rather than immediately before styling.
- Apply texturizing spray to dry roots the next morning for grip.
- Section hair and apply heat protectant before any curling or straightening.
- Style, then set with hairspray and let it cool before touching.
Pro Tip: Curl hair before the wedding morning and sleep with it loosely pinned up so the waves fall naturally by ceremony time.
Where to Place Your Veil With Each Hairstyle
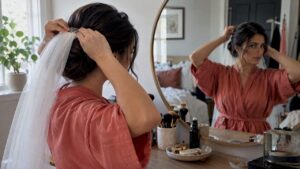
Veil placement depends entirely on the hairstyle underneath it, and getting this wrong is one of the most common DIY frustrations. Brides lays out clear rules by style.
- For half-up styles, anchor the veil comb at the crown, just behind the teased or twisted section.
- For a low bun or ponytail, place the comb one to two inches above the style, not inside it.
- For a high bun, secure the veil directly below the bun so the comb has hair to grip.
- For hair worn fully down, place the comb above the crown and tease slightly underneath for hold.
- For a French braid, anchor the veil near where the braid begins at the crown.
Use two to three bobby pins crossed in an X pattern around the comb, and a light backcombing at the anchor point gives the comb something to hold onto all day. Floral clips and combs work the same way, sliding in alongside the veil comb rather than competing with it.
Running a Hair Trial and Timing Wedding-Morning Styling
Even a simple style benefits from a trial run. Book your hair trial about one to two months before the wedding, since trials often reveal veil-fit problems or weather concerns before they become wedding-day surprises, a point Allure also emphasizes.
On the wedding morning, experts recommend scheduling your own styling toward the middle or end of the morning so there’s room for small adjustments before dressing. Many wedding parties build their timeline around an 11 a.m. hair and makeup start for a late-afternoon ceremony, then work backward from there. A detailed getting-ready timeline from a wedding photography team can help you coordinate styling with photo coverage.
- Test your exact veil placement during the trial, not just the hairstyle alone.
- Take photos in daylight, since indoor lighting hides flaws that outdoor light reveals.
- Practice the style at home beforehand, in the humidity or heat you’ll face, to check how long it holds.
Keeping DIY Wedding Hair Intact Through Heat and Humidity
Humidity is the most common reason a DIY style falls apart by the ceremony. Apply anti-frizz serum to dry hair before styling, then seal the finished look with a flexible-hold hairspray rather than a stiff one that cracks under movement. Our humidity-proof styling guide covers product layering in more detail.
If a pin slips or an elastic snaps, you rarely need a full redo. Re-tease the loose section, re-pin at the original anchor points, and mist lightly instead of starting over.
- Keep a small emergency kit on hand: extra bobby pins, a travel hairspray, a small brush, and texturizing spray.
- Before switching from ceremony photos to the reception dance floor, remove just the veil comb and add one or two pins to tighten any loosened sections.
- In extreme heat or humidity, a low bun or slicked-back style often outlasts loose waves, since there’s less surface area for frizz to form.
Pro Tip: Pack a mini bottle of hairspray in your reception bag so touch-ups are quick and easy.
Building a Hair Care Routine Before the Wedding
Healthy hair styles more predictably than damaged hair, so the weeks before a wedding matter as much as the morning itself. Start a deep-conditioning routine before the wedding, using a moisture mask regularly to improve texture and shine.
Trim any split ends before the wedding so curls or waves hold their shape instead of fraying at the tips. If color touch-ups are part of your plan, schedule them with enough buffer that your hair has time to settle before the big day rather than leaving it until the final week.
Cut back on heat styling before the wedding to give strands a break, and switch to a hydrating shampoo and conditioner if your hair tends toward dryness. Avoid introducing a new product or treatment close to the wedding, since reactions or unexpected texture changes are easier to manage when there’s time to recover.
The night before, a light deep conditioner followed by a cool water rinse helps smooth the cuticle without weighing hair down, setting you up for the second-day texture that makes styling easier the following morning.

Photographing Your At-Home Wedding Hairstyle
A great hairstyle can still photograph flat without a little attention to light and angle. Natural daylight from a window flatters hair texture far better than overhead indoor lighting, which tends to flatten curls and wash out highlights.
Take a few test photos during your trial run, not just on the wedding day itself, so you can spot any gaps, flyaways, or uneven sections while there’s still time to adjust the technique. Photograph from multiple angles, since a bubble braid or half-up style can look different from the back than from the front.
Matte finishing products photograph more evenly than high-shine ones under flash, which can create unwanted glare in close-up shots. If your photographer is shooting candids throughout the day, touch up loose pieces regularly rather than waiting until they’re obviously out of place.
Common Mistakes to Avoid When Styling Wedding Hair at Home
Skipping the trial is the single biggest misstep, since a style that looks fine in a quick test at home can behave differently under hours of movement, weather, and a veil’s weight. Rushing the morning-of timeline is a close second: build in extra time beyond what you think you’ll need.
Using too much product too early is another common error. Heavy serums or waxes applied before curling can weigh hair down and shorten hold time, so apply lighter products first and save heavier finishing creams for the very end. Skipping heat protectant to save a step risks both damage and a less polished curl pattern.
Placing the veil comb inside a bun or ponytail, rather than above or below it, is a frequent fix-it-later mistake that a trial run catches early. Finally, trying a brand-new style for the first time on the wedding morning rarely ends well: practice the exact technique at least once beforehand, ideally under the same humidity or heat conditions you’ll face.

What a Stylist Wants Brides to Know About DIY Hair
Reliable DIY looks like a low bun or bubble braid genuinely hold up, and a practiced simple style beats a last-minute attempt at something complicated. One realistic situation comes up often: a bride skips the trial, then spends her wedding morning troubleshooting instead of enjoying it. Practice removes that risk. Pack a small touch-up kit regardless of which style you choose.
— Juiced
When to Bring in Joel C Ma Hair Studio Instead
Some wedding mornings call for an extra pair of hands, especially with complex veils, extensions, tight timelines, or humidity that threatens hours of prep work. We offer Special Occasion (Updo) services starting from $100, along with consultations and trial sessions to plan the look well before the big day.
- Book a consultation to test veil placement and timing together before the wedding.
- Pair an updo with a trial run so there are no surprises on the morning itself.
- Browse our full services in detail if you’re also considering a color refresh or cut before the wedding.
If DIY styling feels like one more task on an already full plate, a scheduled trial with our team takes that pressure off entirely.

FAQ
Can I Do My Own Wedding Hair Myself?
Yes, many brides successfully style their own hair using simple, practiced techniques like a low bun or loose waves. Careful prep, including washing the night before and applying heat protectant, along with at least one practice run, makes a DIY bridal hairstyle realistic to pull off.
How Should I Wear My Hair for My Wedding?
The best choice depends on your dress neckline, veil style, and the weather you’ll face that day, since humidity and heat affect how long a style lasts. A half-up style suits brides who want their face framed without a full updo, while a low bun or bubble braid holds well through a long reception.
Is It Better to Wear Hair Up or Down for a Wedding?
Neither option is universally better: hair worn up tends to hold longer through heat, dancing, and a long day, while hair worn down photographs beautifully but needs stronger hold products in humid conditions. Your dress style, venue, and the length of your day should guide the decision.
When Should I Schedule a Hair Trial Before My Wedding?
Book a hair trial about one to two months before the wedding, which gives enough time to adjust the plan if something doesn’t work. If you’re planning a cut or major color change, discuss timing with your stylist months in advance instead.
How Do I Keep My Veil Secure With a DIY Hairstyle?
Veil placement depends on your hairstyle: at the crown for half-up looks, one to two inches above a low bun, or above the crown for hair worn fully down, according to Brides. A light tease at the anchor point plus two or three crossed bobby pins keeps the comb secure through the ceremony.
Sources
- Exactly Where to Place Your Veil, Based on Your Wedding Hairstyle
- A Beauty Editor’s Tips For Doing Your Own Half-Up Bridal Hairstyle
- Us